ในส่วนของ Code นั้นเราได้ทำการอัพไว้บน Github สามารถกดลิงค์นี้
// Import Library
#include "LiquidCrystal.h"
#include "WiFi.h"
#include "PubSubClient.h"
เริ่มแรกเราได้ทำการ Include library เข้ามาคือ LiquidCrystal.h
ใช้สำหรับแสดงผลข้อความบนจอ LCD, WiFi.h ใช้สำหรับเชื่อต่อ wifi และ
PubSubClient.h ใช้สำหรับ connect mqtt และทำการกำหนด Global variable
ดังนี้
const char *ssid = "Wokwi-GUEST";
const char *password = "";
const char *mqtt_server = "broker.mqttdashboard.com";
int port = 1883;
// Create a random client ID
String clientId = String("CarSensor-1000") + String(random(0xffff), HEX);
WiFiClient espClient;
PubSubClient client(espClient);
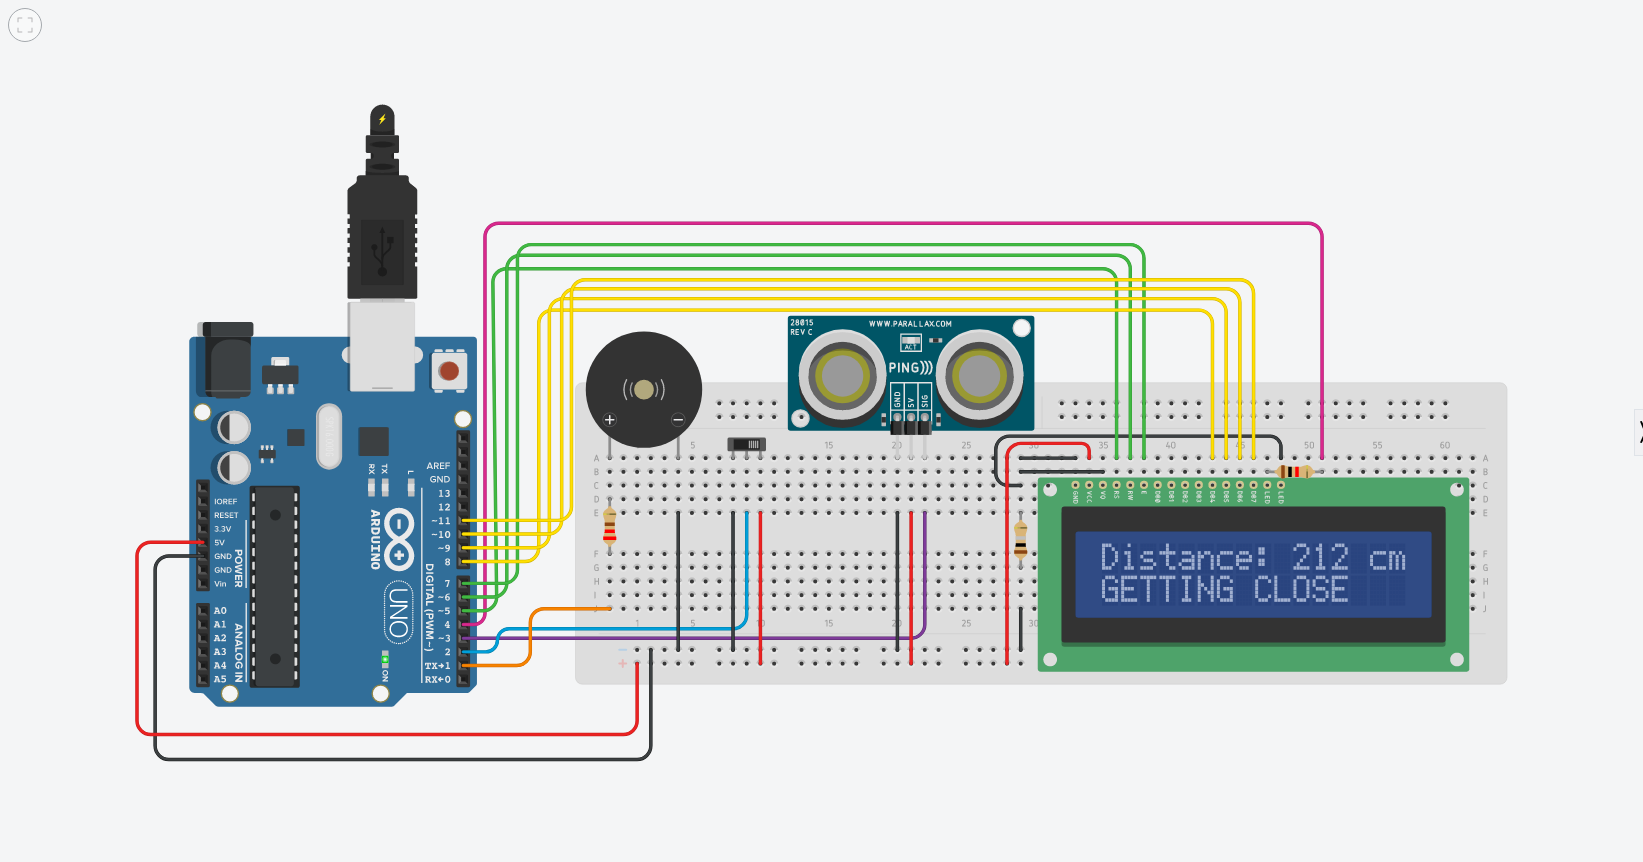
// rs (LCD pin 4) to Arduino pin 5
// enable (LCD pin 6) to Arduino pin 19
// LCD pins d4, d5, d6, d7 to Arduino pins 13, 12, 14, 27
LiquidCrystal lcd(5, 19, 13, 12, 14, 27);
// Buzzer Positive to pin 1
// Switch Common to pin 2
// Ultrasonic SIG to pin 3
int buzzer = 2, switchBtn = 15;
int echoPin = 23, trigPin = 22;
// Show "Off" Text State
int showOffAlr = 0;
long oldDistance = 0;
// All distance
int stop = 70, should = 95, tclose = 150, closes = 200, gtclose = 300;
จากนั้นสร้าง function ที่ชื่อว่า setup_wifi ขึ้นมาเพื่อใช้สำหรับ
connect wifi ซึ่งเราได้ใช้ ssid และ password ของ wokwi
ที่ตั้งไว้ข้างต้นในการ connect ถ้ายัง connect ไม่ติดก็จะแสดงผล ...
ไปเรื่อยๆ เมื่อ connected ก็จะแสดงผล WiFi connected พร้อมกับ local
IP
void setup_wifi()
{
  delay(10);
  // We start by connecting to a WiFi network
  Serial.println();
  Serial.print("Connecting to ");
  Serial.println(ssid);

  WiFi.begin(ssid, password);

  while (WiFi.status() != WL_CONNECTED)
  {
    delay(500);
    Serial.print(".");
  }

  randomSeed(micros());

  Serial.println("");
  Serial.println("WiFi connected");
  Serial.println("IP address: ");
  Serial.println(WiFi.localIP());
}
จากนั้นสร้าง function ชื่อว่า reconnect ที่ใช้สำหรับ connect mqtt
โดยจะทำซ้ำเรื่อยๆหากยังไม่สามารถ connect กับ mqtt server และเราได้
Random client id ใหม่ทุกครั้งที่มีการ connect เพื่อใช้ในการ connect
หาก connect สำเร็จก็จะส่งข้อความว่า Client id นี้ได้ทำการ Join ไปยัง
channel ที่ชื่อว่า swood ซึ่งบนเว็บของเราได้ทำการ handle channel
นี้ไว้ด้วย สามารถเลื่อนขึ้นไปดูด้านบนหัวข้อ
Message
void reconnect()
{
  // Loop until we're reconnected
  while (!client.connected())
  {
    Serial.print("Attempting MQTT connection...");
    clientId = String("CarSensor-1000") + String(random(0xffff), HEX);
    // Attempt to connect
    if (client.connect(clientId.c_str()))
    {
      Serial.println("connected");
      // Once connected, publish an announcement...
      String text = clientId + String(" Join");
      client.publish("swood", text.c_str());
    }
    else
    {
      Serial.print("failed, rc=");
      Serial.print(client.state());
      Serial.println(" try again in 5 seconds");
      // Wait 5 seconds before retrying
      delay(5000);
    }
  }
}
ต่อมาทำการ setup esp32 โดยมีการกำหนด pinMode, กำหนดขนาด LCD
และเปิดใช้งาน, เรียกใช้ func setup_wifi เพื่อเชื่อมต่อ wifi
และตั้งค่า mqtt server และ port ที่จะเชื่อมต่อ
void setup()
{
  Serial.begin(115200);
  pinMode(buzzer, OUTPUT);
  pinMode(switchBtn, INPUT);

  lcd.begin(16, 2); // use 16 col and 2 row
  lcd.clear();      // start with a blank screen
  lcd.display();    // Turn on the display:

  setup_wifi();
  client.setServer(mqtt_server, port);
}
ก่อนจะทำการเขียนการทำงานต่างๆในตัวบอร์ด เราได้สร้าง function
เหล่านี้ขึ้นมาเพื่อความสะดวกในการเขียนและอ่าน ดังนี้
// Sonar Function ใช้สำหรับอ่านค่าจาก HC-SR04 และแปรงเป็นระยะห่างหน่วย Cm
long sonar()
{
  // The HC-SR04 is triggered by a HIGH pulse of 2 or more microseconds.
  // Give a short LOW pulse beforehand to ensure a clean HIGH pulse:
  pinMode(trigPin, OUTPUT);
  digitalWrite(trigPin, LOW);
  delayMicroseconds(2);
  digitalWrite(trigPin, HIGH);
  delayMicroseconds(5);
  digitalWrite(trigPin, LOW);

  return pulseIn(echoPin, HIGH) / 29 / 2; // convert the time into a distance (cm)
}
// beepDelay ใช้สำหรับ Return ค่า Delay ที่จะหน่วง buzzer ให้ถี่ตามที่กำหนด
int beepDelay(long cm)
{
  // return beep beep delay
  int milisec = 1000;
  if (cm <= stop)
    milisec = 0;
  else if (cm <= should)
    milisec = 75;
  else if (cm <= tclose)
    milisec = 150;
  else if (cm <= closes)
    milisec = 300;
  else if (cm <= gtclose)
    milisec = 600;
  return milisec;
}

// beepSound Function ใช้สำหรับสั่งให้ buzzer ดัง
void beepSound(long cm)
{
  int delayVal = beepDelay(cm); // get beep beep delay value
  digitalWrite(buzzer, HIGH);

  if (delayVal != 0) // if val is 0 then buzzer will not stop beepๆๆๆ
  {
    delay(delayVal);
    digitalWrite(buzzer, LOW); // stop beep
    delay(delayVal);
  }
}
// showText Funtion ใช้สำหรับแสดงตัวอักษรตามระยะห่างที่รับค่าเข้ามา และส่งข้อความไปยัง mqtt server หากระยะห่างนั้นน้อยมาก
void showText(int cm)
{
  if (oldDistance != cm) // if distance not change then dont need to update display
  {

    lcd.clear(); // clear all text
    lcd.setCursor(0, 0);
    if (cm < 336) // Should be in range
    {
      // Row 1: Show Distance num
      lcd.print("Distance: ");
      lcd.print(cm);
      lcd.print(" cm");
      Serial.println(cm);
      // Row 2: Show warning text
      lcd.setCursor(0, 1);
      if (cm <= stop)
      {
        lcd.print("STOP!");
        // Send to MQTT
        String text = clientId + String(" Crached");
        client.publish("swood", text.c_str());
        Serial.println(text);
      }
      else if (cm <= should)
        lcd.print("SHOULD STOP");
      else if (cm <= tclose)
        lcd.print("TOO CLOSE");
      else if (cm <= closes)
        lcd.print("CLOSE");
      else if (cm <= gtclose)
        lcd.print("GETTING CLOSE");
      else
        lcd.print("NOT CLOSE");
    }
    else
      lcd.print("OUT OF RANGE");
  }
  oldDistance = cm;
}
สุดท้ายเขียนการทำงานต่างๆลงใน function loop ของเจ้าบอร์ด
โดยทุกครั้งจะมีการเช็คว่าเชื่อมต่อกับ server
อยู่รึป่าวหากไม่ก็จะทำการเชื่อต่อใหม่ และทำการอ่านค่าจาก Switch
หากเป็น Low ก็ทำการ clear LCD และแสดงผลข้อความให้รู้ว่า Switch
ยังถูกปิดอยู่ แต่หากเป็น High ก็จะทำการเรียกใช้ function sonar
เพื่อรับค่าระยะห่างจาก HC-SR04 แล้วส่งไปยัง function showText
เพื่อแสดงข้อความตามระยะห่างนั้นๆ และก็ส่งไปยัง function beepSound
เพื่อให้ buzzer ถี่ตามระยะห่างนั้นๆ และก็เสร็จสมบูรณ์!!
void loop()
{
  if (!client.connected())
  {
    reconnect();
  }

  int sw = digitalRead(switchBtn); // Read switch state

  if (sw == HIGH)
  {
    long cm = sonar();
    showText(cm);  // Display Distance num, text
    beepSound(cm); // Beep Beep Sound up to distance

    showOffAlr = 0; // just set value to 0 for off state
  }
  else
  {
    if (showOffAlr == 0) // clear display if already show some text
      lcd.clear();

    // Show this text if switch state is off
    lcd.setCursor(6, 0);
    lcd.print("Off.");
    lcd.setCursor(1, 1);
    lcd.print("turn on switch");
    showOffAlr = 1;
  }

  delay(100);
}